RoarTheme Apps
These apps are for RoarTheme's clients ONLY. They are made to help extending RoarTheme templates' capability, to complete the features that cannot be implemented within template technique.
To learn how to install this app type, please follow this instruction
Express Install
- Use this app to install any RoarTheme themes you purchased
- Install any skins you like without complex uploading steps
- You will always have the latest version of your themes with Express Install
Step 1: Installation
To install, click https://haloroar.com/private/importer/install and then follow this instruction
Step 2: Usage
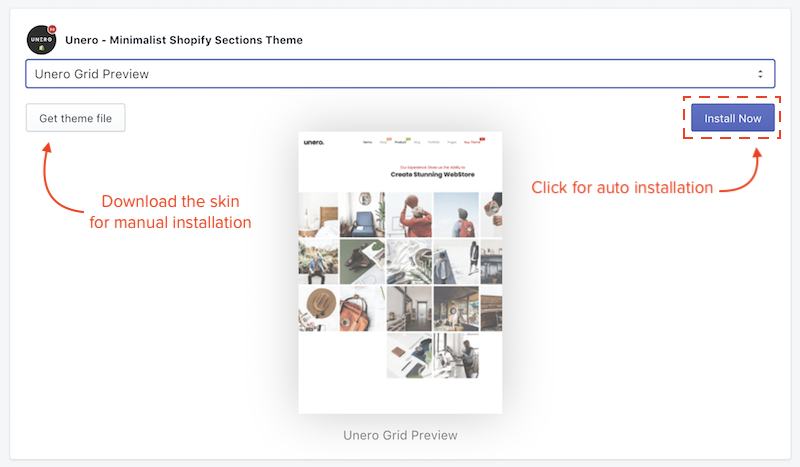
- Based on the Purchase Code you provided in the install process, the theme matched the Purchase Code and its skins will be listed. Just choose the skin you like to install
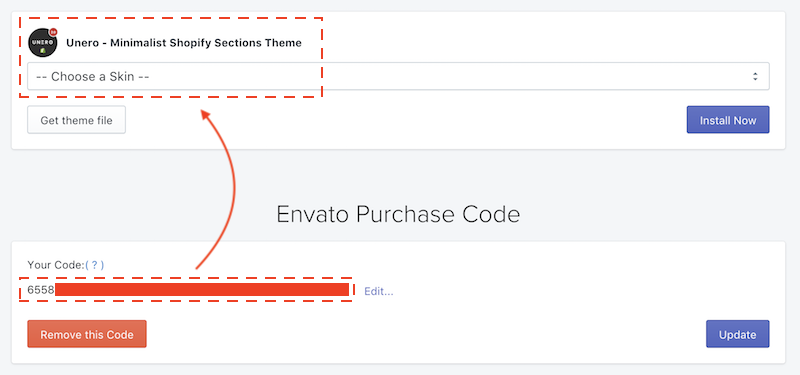
- After choosing a skin you like, click Install Now to install. You can also choose Get the theme to get the skin file, but you have to upload it to your store manually then
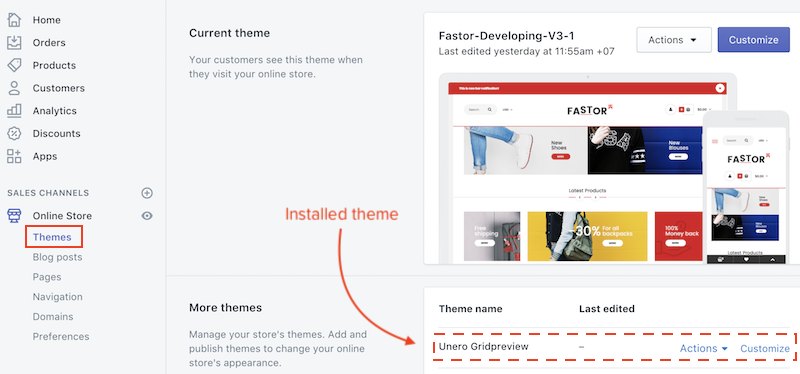
- The installed theme will shortly appear in your Themes section
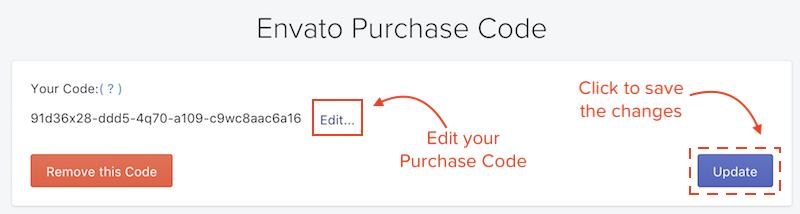
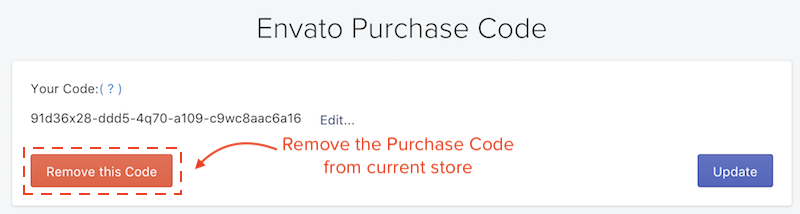
- If you purchase another RoarTheme theme, you can switch to that theme by Editing the Purchase Code
- One Purchase Code is for one store only. Therefore, you cannot share the code for any other stores for multiple usages.
- In case you need to move to another store, please Remove the code in current store first.
Wishlist
Step 1: Installation
To install, click https://haloroar.com/private/wishlist/install and then follow this instruction
Step 2: Usage
To active the Wishlist function in your store, installing the app is not enough, you MUST complete the final steps below:
-
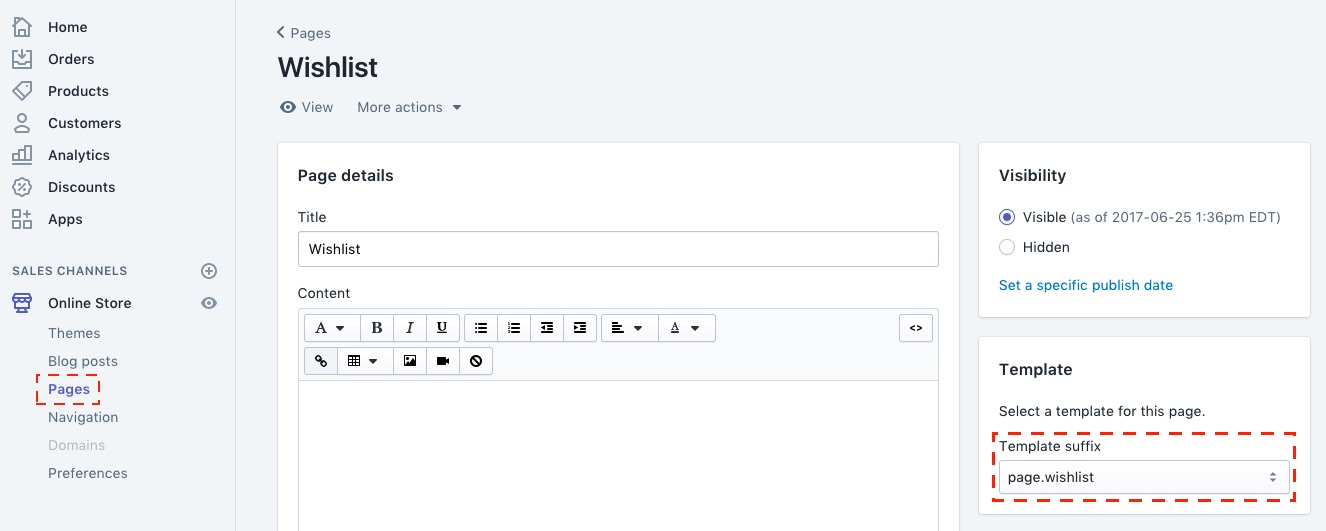
Go creating a page for wishlist. Please note that you must set the Template as page.wishlist
-
In the theme general settings, enable the feature and choose the page you just created.

Lookbook
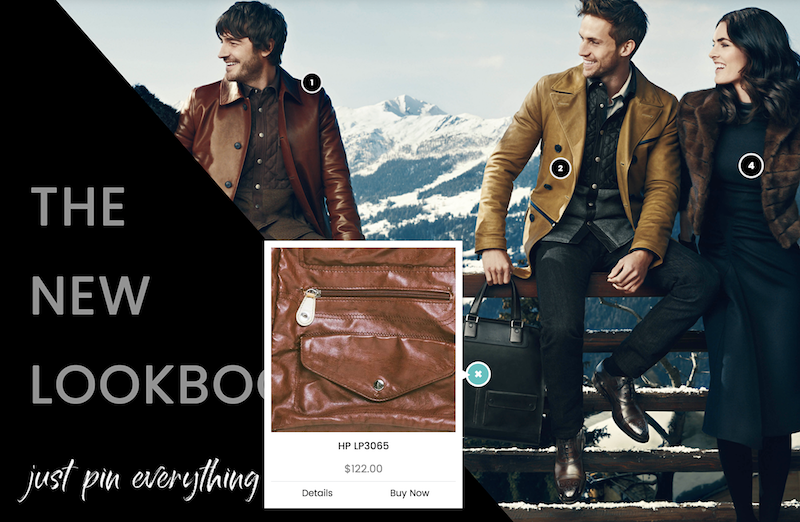
- This app allows you to put lookbooks into your store.
- You can pin anything you like, such as products, pages... on the image of a lookbook
Step 1: Installation
To install, click https://haloroar.com/private/lookbook/install and then follow this instruction
Step 2: Usage
1. App Dashboard
In the app Dashboard, you can see all of your lookbooks. This app allows you to create various lookbooks as you want
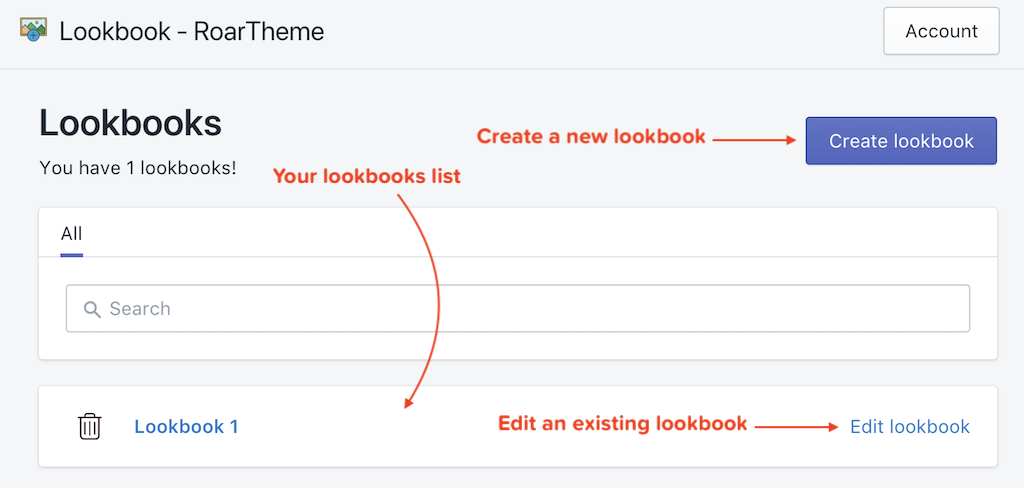
2. Create a Lookbook
-
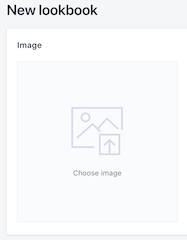
If you create a new lookbook, you will be asked to choose a background image:
-
You can see the editor screen then. You also see this screen when editing an existing lookbook:
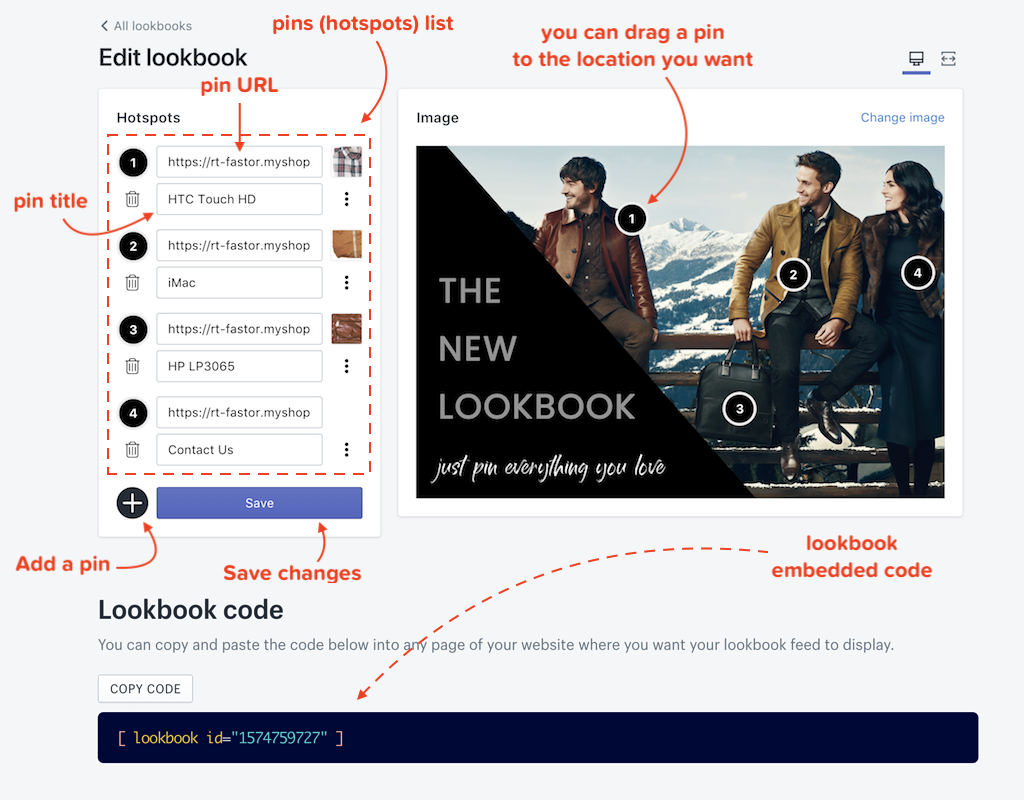 When adding a pin, please enter the URL and the title for it. If you enter a product URL, the app can recognize and will set the title automatically
3. Display your lookbook
To display a lookbook, copy its embedded code and:
-
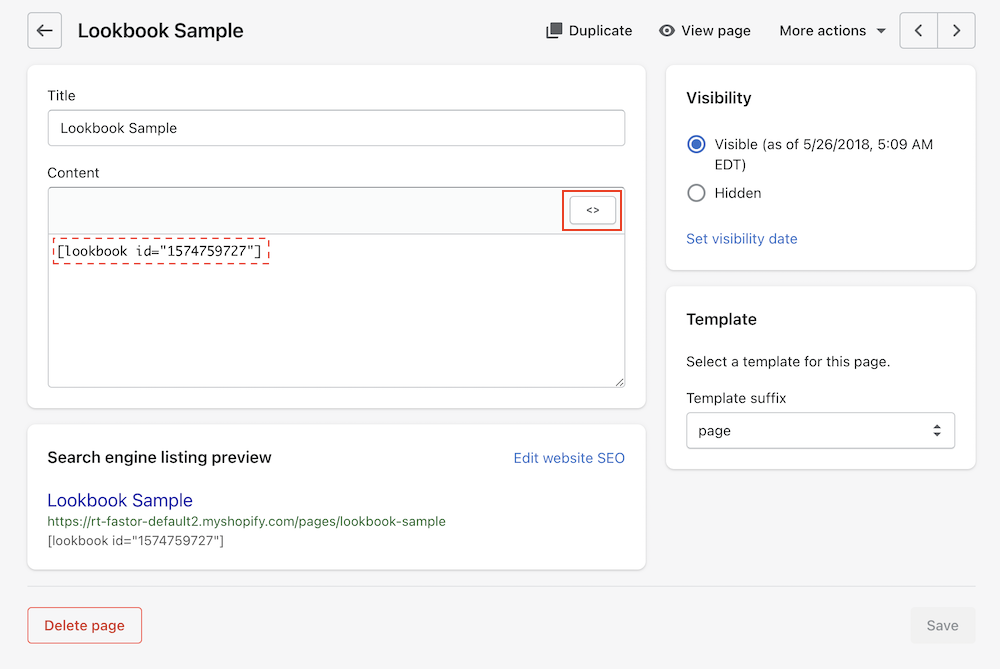
If you want to display the lookbook in a Page, create a page in your store admin and within the content editor, click <> button to switch to HTML mode and paste the embedded code here. (**)
-
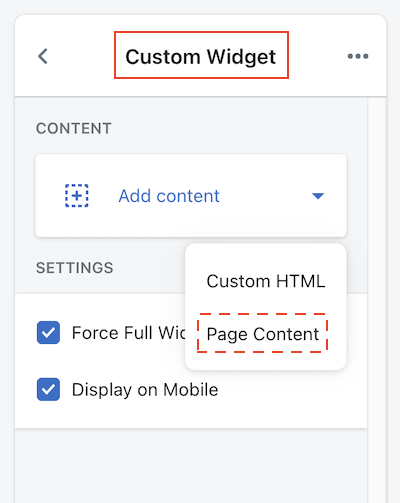
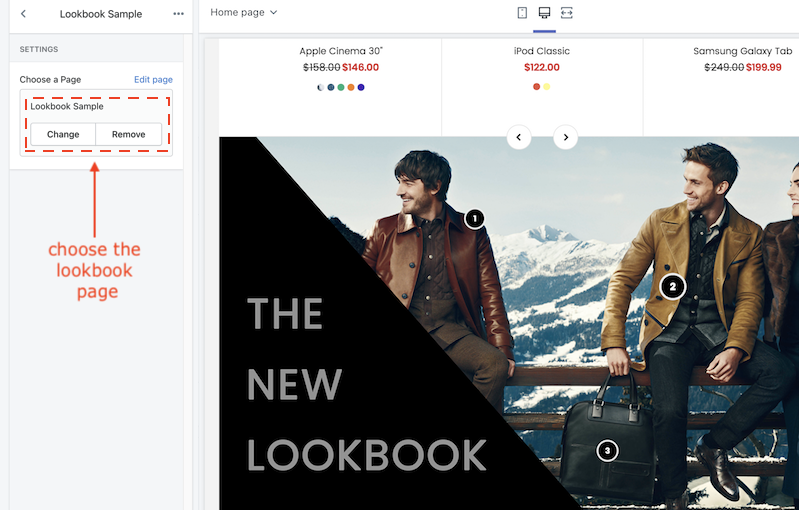
If you want to display the lookbook in Home Page, add a Custom Widget section, add Page Content then choose your Lookbook Page (mentioned in **)
-
If you know coding (HTML/CSS), just paste it into any places in the theme source code you want.
Products Popup Notification
- This app can help boosting up sales by letting your shoppers know which products were purchase.
- To install, click https://haloroar.com/private/popup/install and then follow this instruction
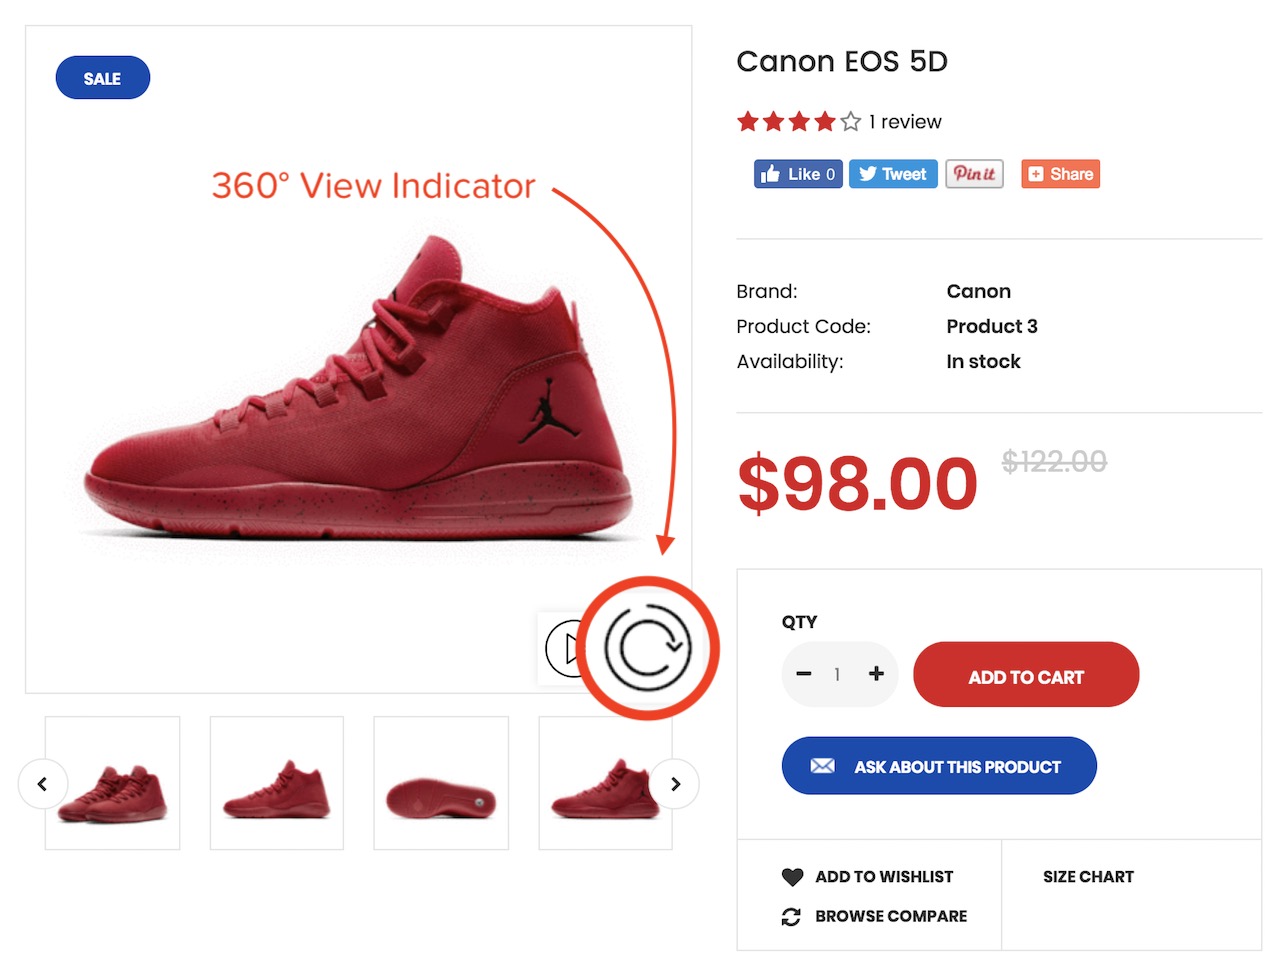
360 Degree Product View
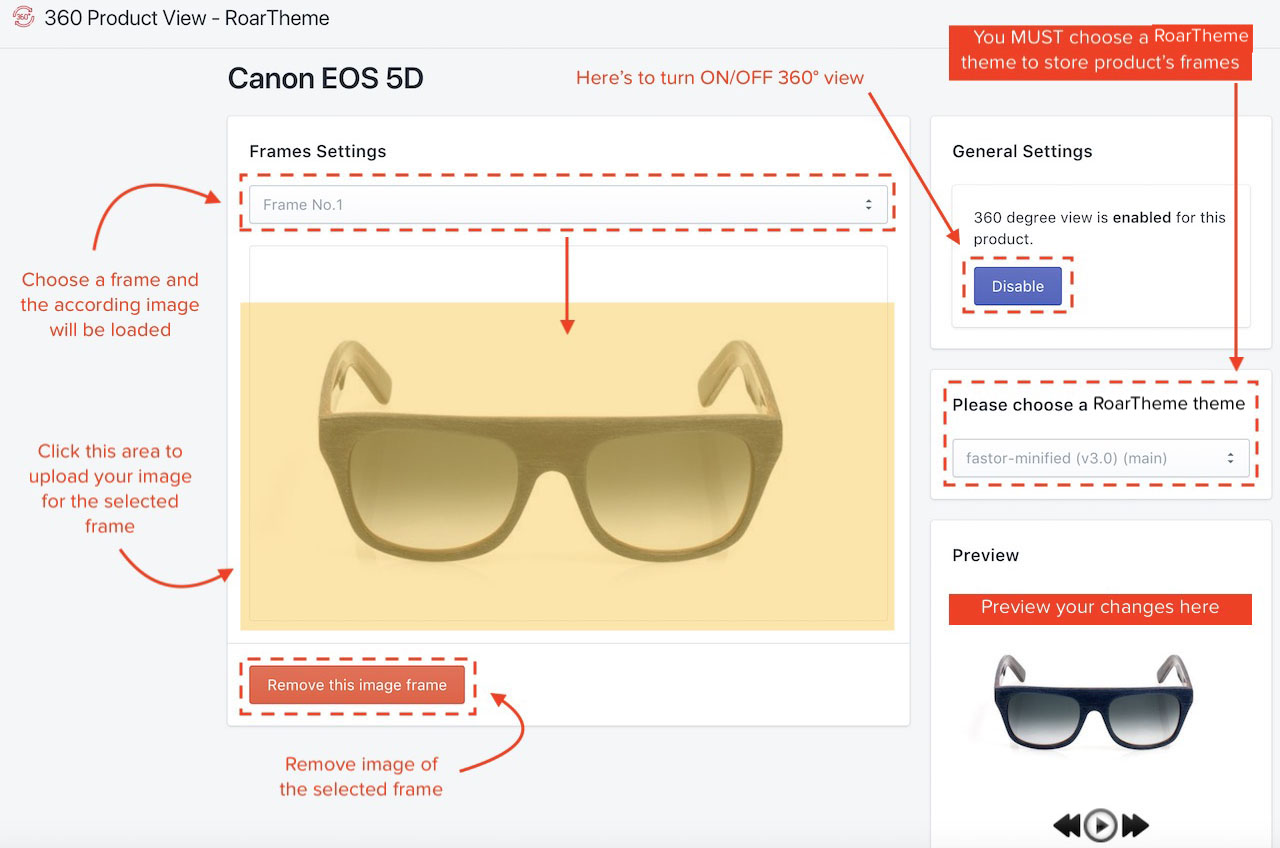
This feature allows you to combine multiple images (frames) of your product from various view into an animated video. You can check the sample here
Step 1: Installation
To install, click https://360view.roarapi.com and then follow this instruction
Step 2: Usage
-
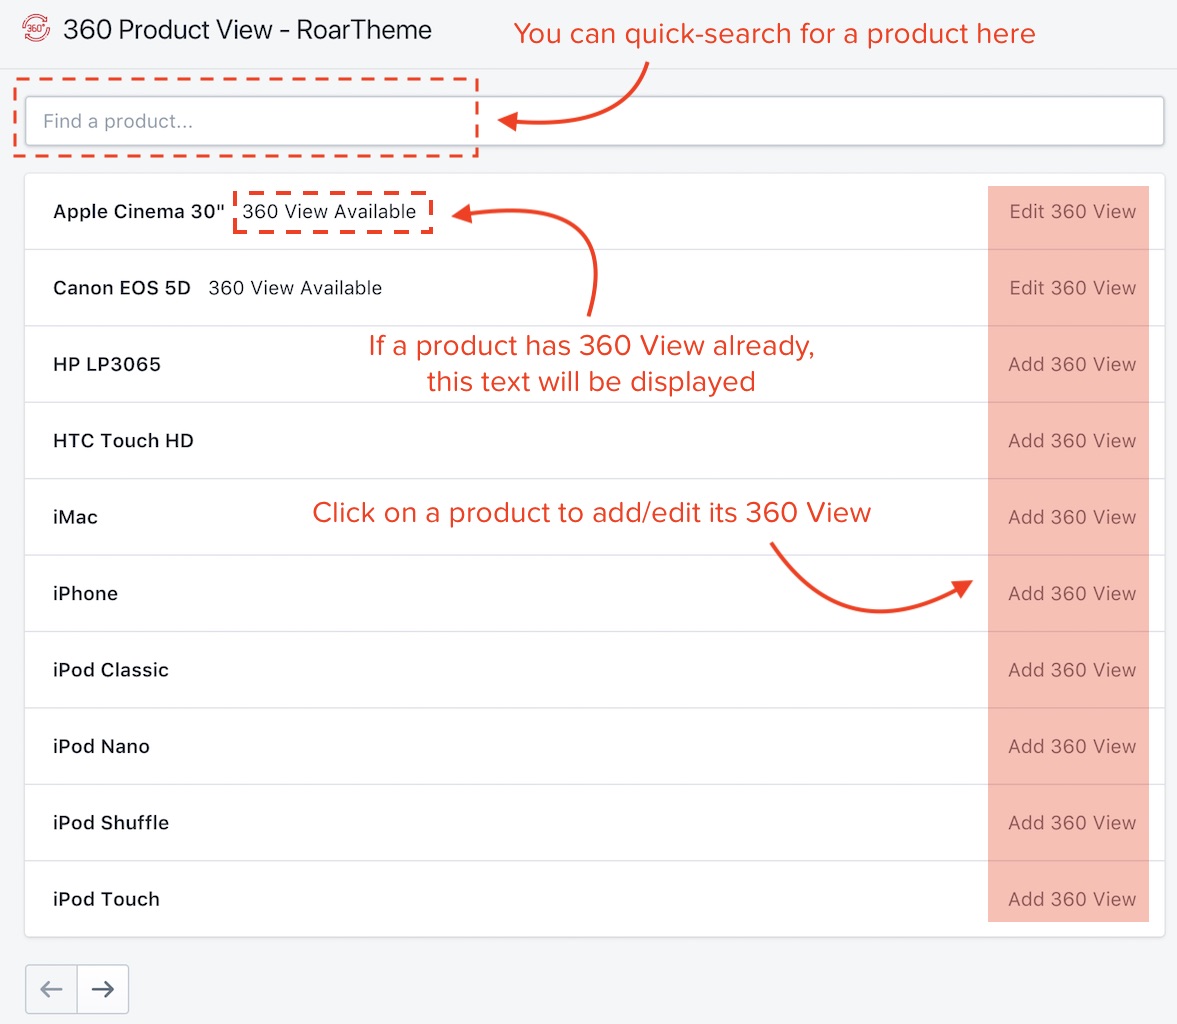
If your Purchase Code is valid and the installation is complete, you will be redirected to App Dashboard:
-
You can make animation from up to 72 images (frames). The 360° View requires at least 2 frames to be visible. The more frames you set, the more smooth animation is
Metafields Manager
What is Metafields?
Sometimes, you need to put more information into a certain product. For example, you need to attach a countdown of sale into a product. Basically, you cannot do this because there is no place for you to put this info in your store admin. In this case, we need metafields.
The metafields (metafields object in full name) allows you to store additional information for products, collections, orders, blogs and pages.
This app help you to add/edit metafields of any products, collections, orders, blogs, pages in your shop. Metafields CAN NOT be accessed via your store admin, it's transparent to even store owner. It can be read ONLY VIA source code. Therefore, this app is used as a supplement for other RoarTheme apps ONLY. Please use under an instruction ONLY
Step 1: Installation
To install, click https://haloroar.com/private/metafields/install and then follow this instruction
Step 2: Usage
1. Access the metafields
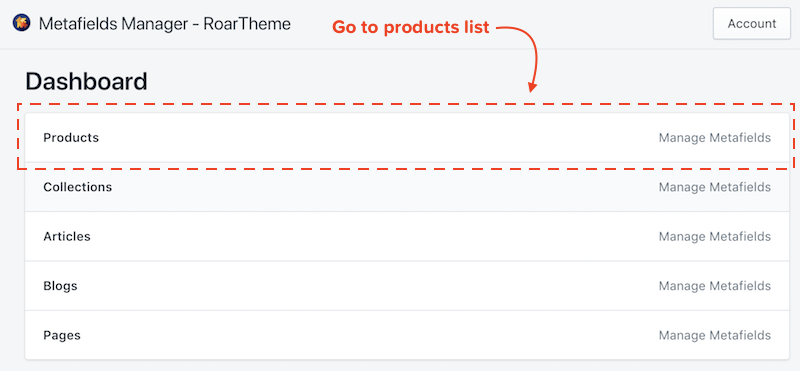
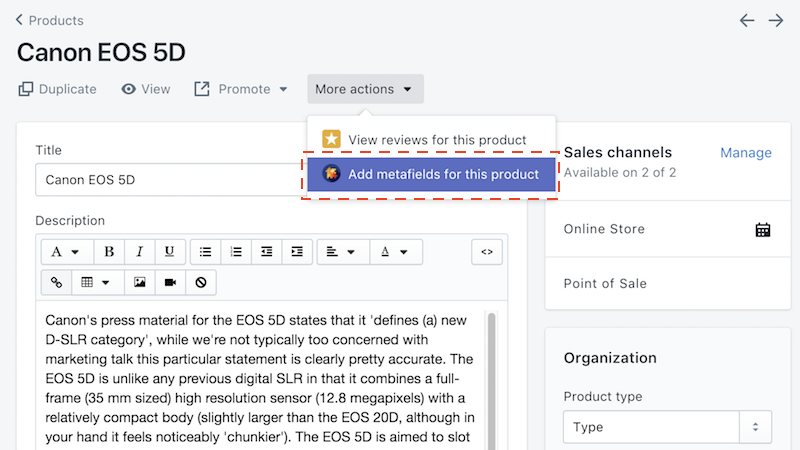
You have 2 ways to access the metafields of an item (product, collection, blog...). For example, a product:
-
From the app Dashboard:

-
From your product admin:
2. Add/Edit a metafield
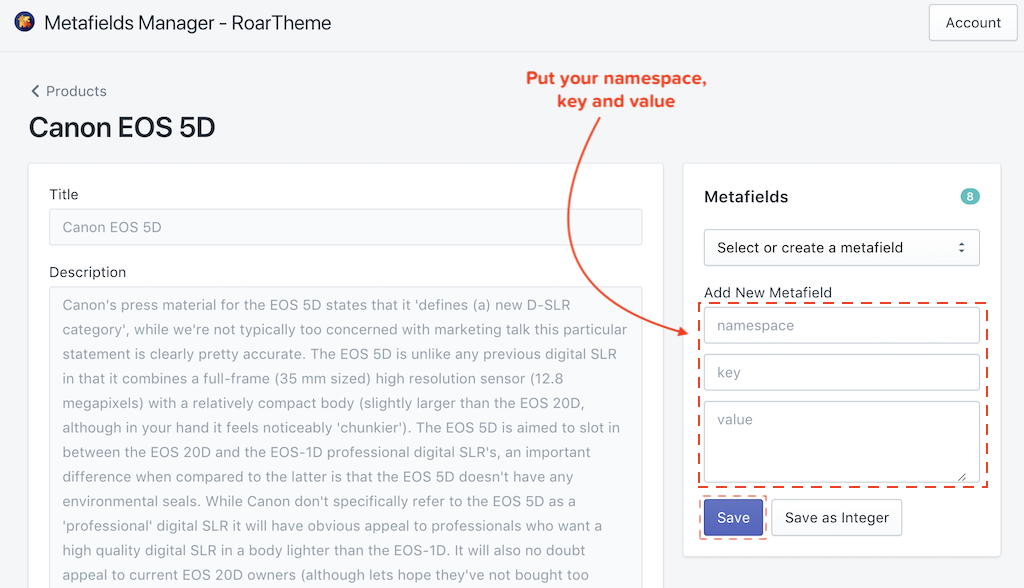
A metafield consists of a namespace, a key and a value. Use the namespace to group different metafields together in a logical way.
For sample, if I am told to add a metafield with given info:
| Namespace | Key | Value |
|---|---|---|
additional_info |
warranty |
2 years |
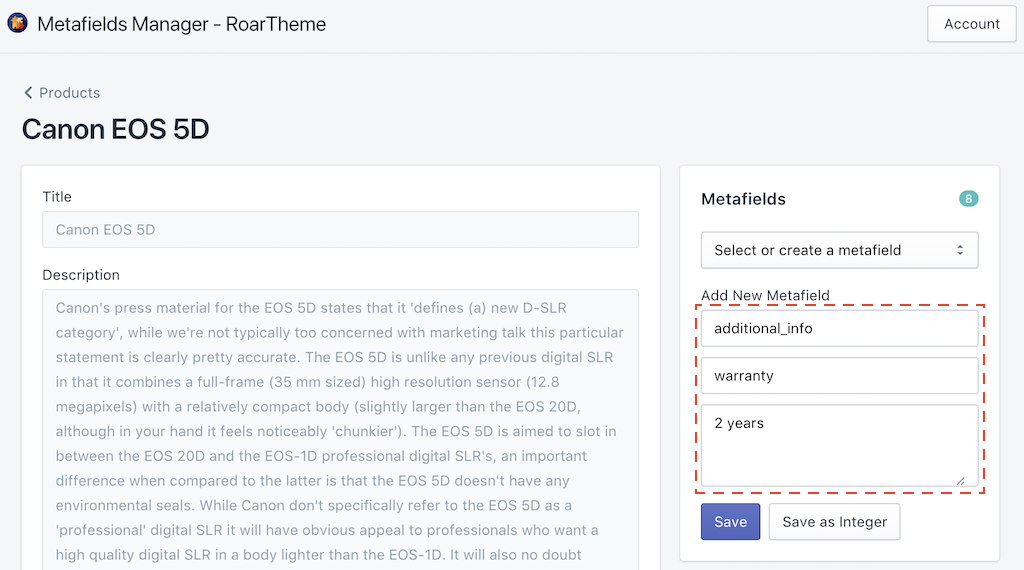
Then I should do:
To edit an existing metafield, select it in the dropdown, then type your new value. Please note that the namespace and key can NOT be changed. You can remove an entire metafield, but cannot edit its namespace or key:
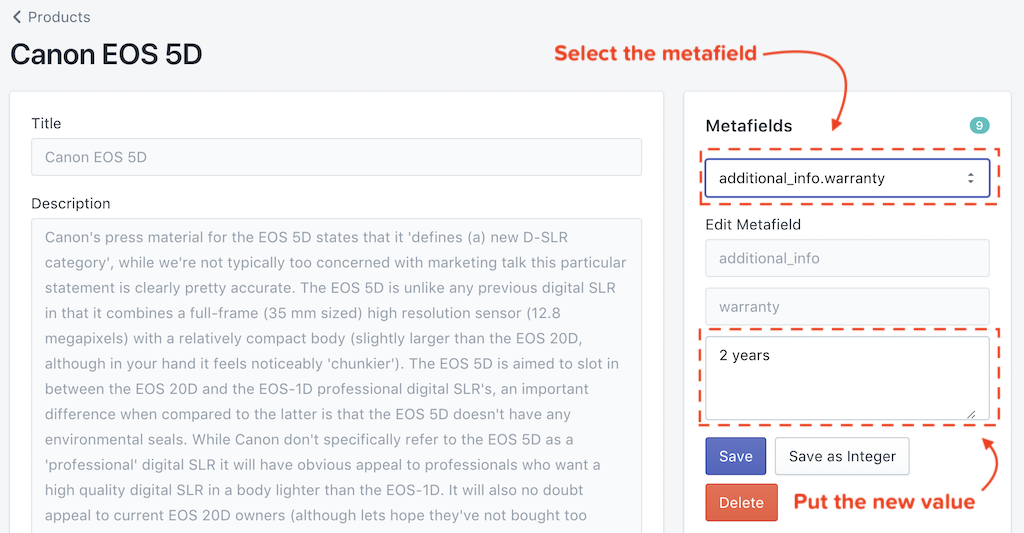
Of course, please do remember to click Save to keep the changes.